Each campaign creates its own unique Smart Funnel experience.
A campaign allows you to:
- Link one promotion (optional)
- Attach one or more products
- Collect customer feedback
- Route customers to the correct marketplace review page
- Customize branding and funnel settings
You can create multiple campaigns to support different products, promotions, or marketing strategies.
Note: You do not need separate campaigns for each marketplace. If you sell across Amazon, eBay, Walmart, Etsy, Shopify, or WordPress, you can include all relevant products within a single campaign and use one QR code.
Pro Tip: After setting up your campaign, always preview and test the funnel to ensure everything works exactly as intended.
Creating a Campaign #
Step 1: Navigate to Campaigns #
From your dashboard, select Campaigns from the main menu.
Step 2: Click + Campaign #
Complete the required fields below.
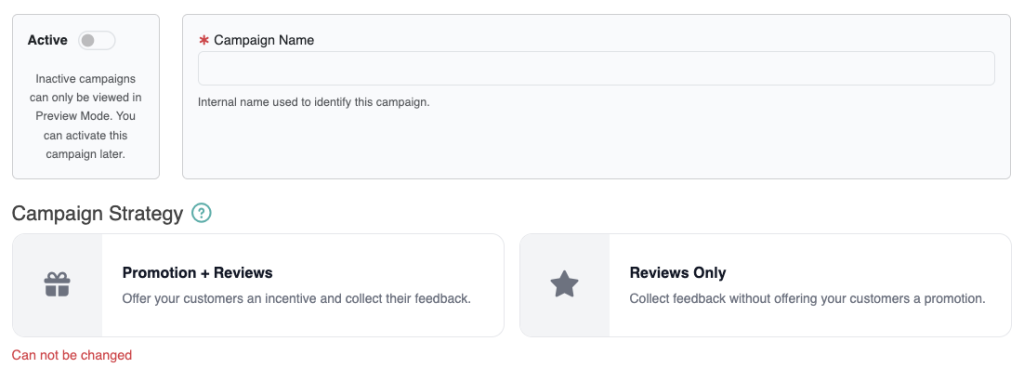
Campaign Status #
Switch the Active status on to make the campaign live.
- Active campaigns are accessible to customers.
- Inactive campaigns are available only in Preview Mode.
Campaigns are Inactive by default.
Campaign Name #
Enter a name for internal reference. Customers will not see this.
Campaign Strategy #
Select either Promotions or Reviews. This cannot be changed after creation.

When creating a campaign, you must choose one of two strategies. This selection cannot be changed later.
Promotions + Reviews #
This option allows customers to redeem a promotion (such as a discount code, gift card, or free gift) after completing the funnel.
Requirements before selecting this strategy:
- At least one product must be added.
- At least one promotion must be created.
A Promotions Strategy campaign can include multiple products but is linked to one promotion.
Reviews Only #
This option focuses purely on collecting customer feedback and encouraging reviews.
A promotion is not required.
This strategy is ideal if your goal is feedback collection without offering incentives.
Important: Campaign strategy cannot be changed after the campaign is created.
Promotion #
If using the Promotions Strategy, select the promotion to associate with this campaign.

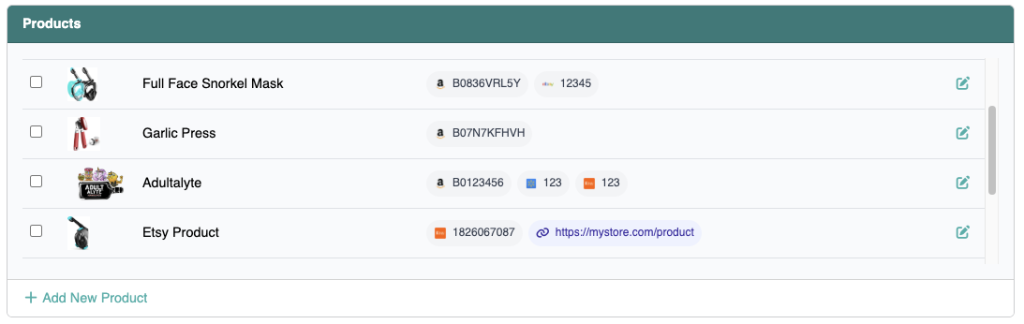
Product #
Select the product(s) associated with this campaign. Ensure the selected marketplaces match where the product is sold.
Marketplaces #
Select the marketplaces where your product is sold.
Customers will choose the marketplace where they purchased your product, and the system will redirect them to the correct review page.

Campaign Options #
Review Is Required #
This setting applies only to the written feedback collected inside your funnel.
If enabled, customers must leave written feedback before completing the funnel.
This does not require customers to leave a review on Amazon or any marketplace. Marketplace reviews are always optional.
Review Type (Amazon Only) #
- Product Review: Redirects customers to the product detail page.
- Seller Feedback: Redirects customers to the Seller Feedback page.

This setting applies to Amazon only.
Minimum Review Length #
Set the minimum character count required for written feedback inside the funnel.
Enable Smart Reviews #
Enabled by default.

When enabled:
Customers who select “Very Satisfied” or “Somewhat Satisfied” are shown the option to leave a public review.
When disabled:
All customers are shown the review page option regardless of rating.
Default Language #
Choose the language used in the funnel and customer emails.

Branding Options #
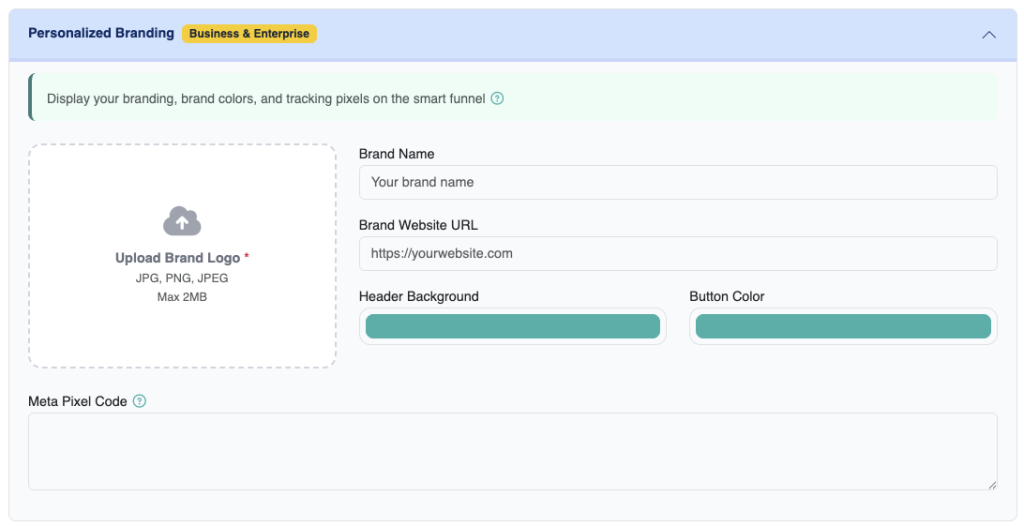
Brand Logo #
Upload your logo to replace ReviewScanGo branding in the funnel.
Brand Name #
Add your brand name to display within the funnel.
Brand Website URL #
Provide your website URL. Customers can click your logo or brand name to visit your site.
Header Background Color #
Customize the funnel header color to match your branding.
Button Color #
Adjust button colors for brand consistency.
Meta Pixel #
Add your Meta Pixel code (formerly Facebook Pixel) to track and retarget customers.
Learn more about Meta Pixel here.
Archive This Campaign #
Archive the campaign to hide it from your main campaign list. Archived campaigns can be viewed using the “Show Archived” filter.
Step 3: Save the Campaign #
After completing all required fields, click Submit to save the campaign.
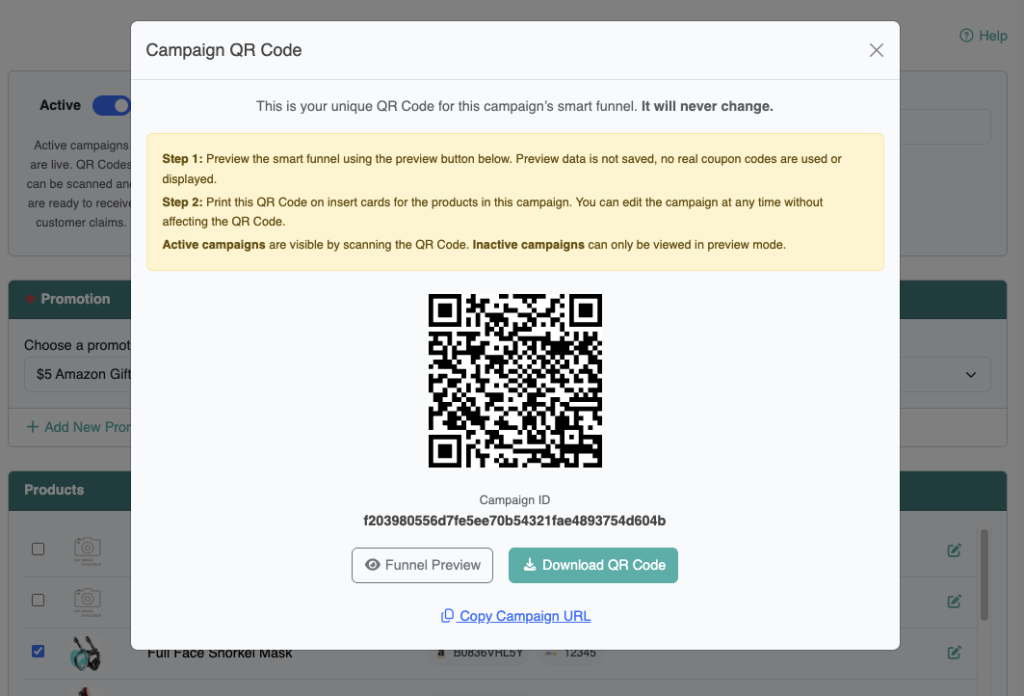
Downloading Your QR Code #
Once saved, a unique QR code is automatically generated for the campaign.
Download the QR code and print it on your product insert cards.
Important: Each QR code is permanently tied to its campaign and will never change, even if you update campaign settings.
Previewing and Testing Your Campaign #
You can preview your campaign by clicking the Preview link in your dashboard.
You can also test the live funnel by scanning the QR code (campaign must be Active).
Preview Mode Notes:
- Preview is available for both Active and Inactive campaigns.
- Information entered in Preview Mode is not saved.
- QR code scanning works only for Active campaigns.
- You cannot leave reviews on your own products, so ensure you are logged out of your seller account when testing.
Video Tutorial #
For a complete walkthrough of campaign setup, watch the video tutorial below.